- Joined
- Sep 25, 2006
- Messages
- 572
I decided that the lid I would build for my octopus tank needed to be waterproof, octopus-proof, and idiot-proof (It must latch itself automatically just by being closed, and not rely on me to remember to latch it). This is what I came up with, and it works great!
See the pictures at the bottom, I don't know how to insert them here!
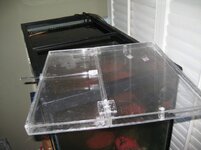
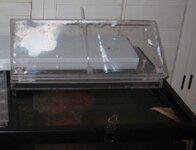
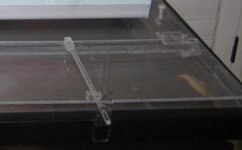
The top is a Double-paned, acrylic, version of the standard two-piece, hinged glass top that aquariums generally come with. In my version the rear of the two top pieces is bolted down to the top plastic frame of the tank (using nylon bolts, washers, and nuts).
My tank is chilled so this top is double paned with ¾” airspace in between so that it insulates. The ¾” strips that make the “walls” of the top also keep the acrylic sheet from warping. If you want your top to be single paned, you should still glue these ¾” (or ½”) wide strips on to make the top rigid, so it would be the same as mine but with the top, (or bottom) pane of acrylic missing.
Materials:
All the acrylic materials are available from Plastic Sheets, Rod, Tube & Fabrication Services Since 1914 | ePlastics® which is also Ridout Plastics in San Diego. Click the dropdown for “plexiglass” for the acrylic stuff. Or “Search” for the Item ID numbers I give below. The only expensive part is the acrylic sheet. I got lucky and found a couple of big sheets on Craigs List for cheap, but if you can’t do that, and end up order it from eplastics, they can cut all your pieces out for you for between $15 and $25 extra, which is a huge work savings.
Specifically, the parts (and ID Numbers) I used from www.eplastics.com where:
1) 3/4" plastic strips (for the sides) - ACR.187X.750
2) 2" acrylic hinges - ACRYLICHINGE2"
3) 1/8" acrylic sheet - ACRYCLR0.125PM24X48
4) 1/4" acrylic rod, 6' long (for latch) - ACREXR.250
5) 3/16" square acrylic tube (for latch) - ACREXSR.375
6) Acrylic glue, thick - Weld-on #16 (IPS #16) - IPS16-5OZ
7) Acrylic glue, thin (watery) - Weld-on #4 (IPS #4)
8) Needle tipped applicator for Weld-on #4 glue - HYPO25
I actually used 3/16” thick acrylic sheet instead of the 1/8” I list above. I got mine cheap, but I think the thinner 1/8” stuff will work fine. I also needed nylon nuts, bolts, and washers, which I found at a specialty fasteners place in San Diego. Most towns have at least one place that tries to stock every kind of nut, bolt, screw, and fastener, and they would have nylon bolts, or you can try to find a source online.
Tools:
1) Miter box saw - $15 at Home Depot. Used to cut acrylic pieces to length (not for acrylic sheet)
2) Pistol Drill – Used to drill holes in acrylic for hold down bolts.
3) Measuring tape
4) Tools for cutting acrylic sheet (unless you order it pre cut) – see “Methods” below.
5) Medium to coarse sand paper to smooth the cut edges of the acrylic
6) Needles (or maybe fishing line) to use as spacers when using the thin/watery acrylic glue (Weld-on #4)
Methods:
1) Cutting acrylic sheet. If you order it from eplastics.com they can cut it to your specs for between $15 and $25, but if you find it cheaper, or used, somewhere else (like CraigsList) you’ll need to cut it to size yourself. I have a table saw, so I bought a blade for cutting plastic (lots of little teeth) and cut it myself. Cut slowly, at a low speed, spraying water on the blade as needed to keep it cool so you don’t melt the plastic. The blade was expensive. A cheaper way to go would be to “etch and break” the acrylic. For this you’ll need a straight edge, and a sharp, pointy, tool that can make a deep scratch in the acrylic. Make a straight, deep, scratch all the way across a piece of acrylic, lay the etched line along the edge of a counter or table and push down on the overhanging end of the acrylic sheet. Ideally the acrylic sheet will break along the etched line. You want the force to be even along the scratch, so you may want to use straight pieces of wood, parallel to the etch, to do the pushing. A jigsaw with a metal cutting blade, on low speed might work too, or even a regular crosscut handsaw, if you can follow the line. Just make sure the blade doesn’t get hot enough to melt the plastic.
2) Gluing Acrylic – The fumes can be a problem, so do it outside. I expected my seems to all be air tight, but they weren’t. If you need them to be, then run a second bead of glue along the seam after you glue two pieces together.
[addendum] I've learned more about gluing acrylic since I built this top and wrote this post. I recommend that you find some sites on the internet that discuss gluing acrylic in detail, but in short, I think it would be better to use the water thin acrylic glue (Weld-on #4) instead of the syrup thick glue (Weld-on #16). The trick with the thin stuff is to use needles or short pieces of fishing line as spacers to create a very narrow gap between the two pieces that you want to bond. Then using a needle tipped applicator, inject the watery glue into that narrow gap. Because of capillary action (surface tension) the glue will be drawn into the gap, and even itself out. After a few minutes (?) you remove the needles. The result is a nice clean looking seam without any bubbles or blobs.
3) Don’t make it too tight! – The completed top will lay down into the recess formed by the plastic edging at the top of your tank. Design in about 1/8” of extra space all around the top, so that just in case the finished top is a little larger than your design, it will still fit. Place the hinges so that the two top pieces have about 1/16” gap between them. That way, the lid will close all the way, even if a little bit of salt or blob of glue get between the two halves. I didn’t design this extra space in, and I learned that even using a table saw to cut the pieces, in practice the finished product will probably be just a hair larger than you intended. I had to sand mind down a little to make it fit.
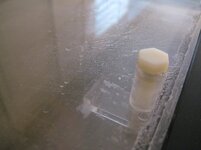
4) Water vapor and condensation – Ideally you don’t want the inside of the boxes that make up the lid to fog up. That would partly block your lighting, and not look as nice, but in an octo tank you don’t want bright light anyway, so maybe a little fogging up won’t bother you. I tried to make the top air tight inside, and to build in a packet of desiccant inside the top (desiccant absorbs water from the air). Well my seams weren’t air tight, so the desiccant was quickly used up, but it didn’t matter because the top didn’t fog up anyway. I’m actually glad that my seams leaked a little air, because if they really were air tight, then the air inside the top might pop a seam when it got warm and expanded (like under my light) or shrink down when it got cold and cause my top to bow. My advice is to leave at least a little pin hole so that the top can seep air and equalize pressure as needed. If it fogs, and it bugs you, seal it with desiccant inside.
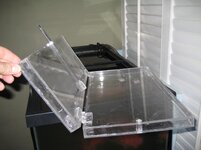
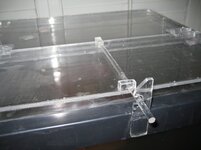
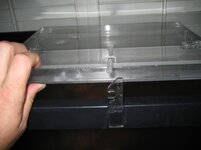
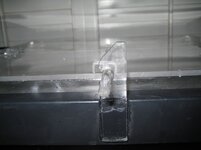
5) The Latch – This is my favorite part of the top design. It may be hard to tell from the pictures, but the latch consists of four parts:
a) ¼” diameter round acrylic rod about 9” long (the rod is a little bit flexible)
b) 1” long piece of square acrylic “tube” with an inside width of ¼” and an outside diameter of 3/16”. Slide this square “sleeve” over the end of the 9” rod, using a little glue. The sleeve has a nice flat surface, which I glued to the top of the front piece of the tank lid, near the hinged edge. The result is that the rod is held to the top at one end, sticks out a couple inches over the edge of the top at the other end, and flexes an inch or so in each direction at the free end.
c) The “Hook” – Glued vertically to the black plastic rim at the top of the tank is a 3” long ¾” wide strip of acrylic (the same stuff I used to make the top). I cut it to make the top pointy, and carved a notch in it (using a drill and then sawing to the hole) that was the right size to hold the ¼” rod. After the top is finished including the hinges, and the rod is glued down at one end, find the correct place to glue the hook onto the top tank frame. You want to place it so that when the lid is being closed, the rod comes in contact with the sloped “point” of the Hook. As the lid closes further the slope on the point of the Hook will cause the end of the rod to flex to the side, slide down the edge of the Hook, and into the notch in the hook. You want to place the hook so that when the top is closed, the rod is fitting nicely in the bottom of the notch. Be sure, when you make the notch, that the bottom of the notch (the hold you drilled in the middle of the hook, is just a little higher (toward the point of the hook) than the opening of the notch. Otherwise, if an octopus were to push on the lid from the inside, the rod might flex to the side again and allow the top to open.
d) The Rod Keeper – This part may or may not be necessary, but I like having it so that I can’t flex the rod too far (and break it) when I use the rod as a handle to open the lid. It is just a little piece of acrylic glued to the top of the lid, on the front edge, near the free end of the rod. The Rod Keeper restricts the free end of rod so that it can only flex side to side (not up) and so that the free end of the rod can only flex far enough to clear the Hook. I happened to have a piece of hollow, square acrylic tube 1” wide, so I cut a ¼” length of that (getting a square cross section) and cut the square down that that it formed a little guard rail 3/8” high and 1” wide. You can use any scraps of acrylic that can be glued together to make the right shape. I think the Rod Keeper is needed so that when you open the lid by grabbing the free end of the rod, and lifting up, you put force on the Rod Keeper, at the front edge of the lid, instead of having all the force go to the glued end of the rod near the hinged edge. That would probably cause the rod to break, or come unglued.
Let me know what I forgot to say. I hope some of you find this helpful.
See the pictures at the bottom, I don't know how to insert them here!
The top is a Double-paned, acrylic, version of the standard two-piece, hinged glass top that aquariums generally come with. In my version the rear of the two top pieces is bolted down to the top plastic frame of the tank (using nylon bolts, washers, and nuts).
My tank is chilled so this top is double paned with ¾” airspace in between so that it insulates. The ¾” strips that make the “walls” of the top also keep the acrylic sheet from warping. If you want your top to be single paned, you should still glue these ¾” (or ½”) wide strips on to make the top rigid, so it would be the same as mine but with the top, (or bottom) pane of acrylic missing.
Materials:
All the acrylic materials are available from Plastic Sheets, Rod, Tube & Fabrication Services Since 1914 | ePlastics® which is also Ridout Plastics in San Diego. Click the dropdown for “plexiglass” for the acrylic stuff. Or “Search” for the Item ID numbers I give below. The only expensive part is the acrylic sheet. I got lucky and found a couple of big sheets on Craigs List for cheap, but if you can’t do that, and end up order it from eplastics, they can cut all your pieces out for you for between $15 and $25 extra, which is a huge work savings.
Specifically, the parts (and ID Numbers) I used from www.eplastics.com where:
1) 3/4" plastic strips (for the sides) - ACR.187X.750
2) 2" acrylic hinges - ACRYLICHINGE2"
3) 1/8" acrylic sheet - ACRYCLR0.125PM24X48
4) 1/4" acrylic rod, 6' long (for latch) - ACREXR.250
5) 3/16" square acrylic tube (for latch) - ACREXSR.375
6) Acrylic glue, thick - Weld-on #16 (IPS #16) - IPS16-5OZ
7) Acrylic glue, thin (watery) - Weld-on #4 (IPS #4)
8) Needle tipped applicator for Weld-on #4 glue - HYPO25
I actually used 3/16” thick acrylic sheet instead of the 1/8” I list above. I got mine cheap, but I think the thinner 1/8” stuff will work fine. I also needed nylon nuts, bolts, and washers, which I found at a specialty fasteners place in San Diego. Most towns have at least one place that tries to stock every kind of nut, bolt, screw, and fastener, and they would have nylon bolts, or you can try to find a source online.
Tools:
1) Miter box saw - $15 at Home Depot. Used to cut acrylic pieces to length (not for acrylic sheet)
2) Pistol Drill – Used to drill holes in acrylic for hold down bolts.
3) Measuring tape
4) Tools for cutting acrylic sheet (unless you order it pre cut) – see “Methods” below.
5) Medium to coarse sand paper to smooth the cut edges of the acrylic
6) Needles (or maybe fishing line) to use as spacers when using the thin/watery acrylic glue (Weld-on #4)
Methods:
1) Cutting acrylic sheet. If you order it from eplastics.com they can cut it to your specs for between $15 and $25, but if you find it cheaper, or used, somewhere else (like CraigsList) you’ll need to cut it to size yourself. I have a table saw, so I bought a blade for cutting plastic (lots of little teeth) and cut it myself. Cut slowly, at a low speed, spraying water on the blade as needed to keep it cool so you don’t melt the plastic. The blade was expensive. A cheaper way to go would be to “etch and break” the acrylic. For this you’ll need a straight edge, and a sharp, pointy, tool that can make a deep scratch in the acrylic. Make a straight, deep, scratch all the way across a piece of acrylic, lay the etched line along the edge of a counter or table and push down on the overhanging end of the acrylic sheet. Ideally the acrylic sheet will break along the etched line. You want the force to be even along the scratch, so you may want to use straight pieces of wood, parallel to the etch, to do the pushing. A jigsaw with a metal cutting blade, on low speed might work too, or even a regular crosscut handsaw, if you can follow the line. Just make sure the blade doesn’t get hot enough to melt the plastic.
2) Gluing Acrylic – The fumes can be a problem, so do it outside. I expected my seems to all be air tight, but they weren’t. If you need them to be, then run a second bead of glue along the seam after you glue two pieces together.
[addendum] I've learned more about gluing acrylic since I built this top and wrote this post. I recommend that you find some sites on the internet that discuss gluing acrylic in detail, but in short, I think it would be better to use the water thin acrylic glue (Weld-on #4) instead of the syrup thick glue (Weld-on #16). The trick with the thin stuff is to use needles or short pieces of fishing line as spacers to create a very narrow gap between the two pieces that you want to bond. Then using a needle tipped applicator, inject the watery glue into that narrow gap. Because of capillary action (surface tension) the glue will be drawn into the gap, and even itself out. After a few minutes (?) you remove the needles. The result is a nice clean looking seam without any bubbles or blobs.
3) Don’t make it too tight! – The completed top will lay down into the recess formed by the plastic edging at the top of your tank. Design in about 1/8” of extra space all around the top, so that just in case the finished top is a little larger than your design, it will still fit. Place the hinges so that the two top pieces have about 1/16” gap between them. That way, the lid will close all the way, even if a little bit of salt or blob of glue get between the two halves. I didn’t design this extra space in, and I learned that even using a table saw to cut the pieces, in practice the finished product will probably be just a hair larger than you intended. I had to sand mind down a little to make it fit.
4) Water vapor and condensation – Ideally you don’t want the inside of the boxes that make up the lid to fog up. That would partly block your lighting, and not look as nice, but in an octo tank you don’t want bright light anyway, so maybe a little fogging up won’t bother you. I tried to make the top air tight inside, and to build in a packet of desiccant inside the top (desiccant absorbs water from the air). Well my seams weren’t air tight, so the desiccant was quickly used up, but it didn’t matter because the top didn’t fog up anyway. I’m actually glad that my seams leaked a little air, because if they really were air tight, then the air inside the top might pop a seam when it got warm and expanded (like under my light) or shrink down when it got cold and cause my top to bow. My advice is to leave at least a little pin hole so that the top can seep air and equalize pressure as needed. If it fogs, and it bugs you, seal it with desiccant inside.
5) The Latch – This is my favorite part of the top design. It may be hard to tell from the pictures, but the latch consists of four parts:
a) ¼” diameter round acrylic rod about 9” long (the rod is a little bit flexible)
b) 1” long piece of square acrylic “tube” with an inside width of ¼” and an outside diameter of 3/16”. Slide this square “sleeve” over the end of the 9” rod, using a little glue. The sleeve has a nice flat surface, which I glued to the top of the front piece of the tank lid, near the hinged edge. The result is that the rod is held to the top at one end, sticks out a couple inches over the edge of the top at the other end, and flexes an inch or so in each direction at the free end.
c) The “Hook” – Glued vertically to the black plastic rim at the top of the tank is a 3” long ¾” wide strip of acrylic (the same stuff I used to make the top). I cut it to make the top pointy, and carved a notch in it (using a drill and then sawing to the hole) that was the right size to hold the ¼” rod. After the top is finished including the hinges, and the rod is glued down at one end, find the correct place to glue the hook onto the top tank frame. You want to place it so that when the lid is being closed, the rod comes in contact with the sloped “point” of the Hook. As the lid closes further the slope on the point of the Hook will cause the end of the rod to flex to the side, slide down the edge of the Hook, and into the notch in the hook. You want to place the hook so that when the top is closed, the rod is fitting nicely in the bottom of the notch. Be sure, when you make the notch, that the bottom of the notch (the hold you drilled in the middle of the hook, is just a little higher (toward the point of the hook) than the opening of the notch. Otherwise, if an octopus were to push on the lid from the inside, the rod might flex to the side again and allow the top to open.
d) The Rod Keeper – This part may or may not be necessary, but I like having it so that I can’t flex the rod too far (and break it) when I use the rod as a handle to open the lid. It is just a little piece of acrylic glued to the top of the lid, on the front edge, near the free end of the rod. The Rod Keeper restricts the free end of rod so that it can only flex side to side (not up) and so that the free end of the rod can only flex far enough to clear the Hook. I happened to have a piece of hollow, square acrylic tube 1” wide, so I cut a ¼” length of that (getting a square cross section) and cut the square down that that it formed a little guard rail 3/8” high and 1” wide. You can use any scraps of acrylic that can be glued together to make the right shape. I think the Rod Keeper is needed so that when you open the lid by grabbing the free end of the rod, and lifting up, you put force on the Rod Keeper, at the front edge of the lid, instead of having all the force go to the glued end of the rod near the hinged edge. That would probably cause the rod to break, or come unglued.
Let me know what I forgot to say. I hope some of you find this helpful.