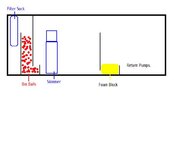
I am planning on building my own sump and was wondering if anyone had any suggestions or ideas that could help me in my designing it. this will be my first sump so.. I am kind of going in the wind.. here is a pic of my design... any info would be greatly appreciated.. thanks..
-
Looking to buy a cephalopod? Check out Tomh's Cephs Forum, and this post in particular shares important info about our policies as it relates to responsible ceph-keeping.
You are using an out of date browser. It may not display this or other websites correctly.
You should upgrade or use an alternative browser.
You should upgrade or use an alternative browser.
building a sump tank
- Thread starter mosthated
- Start date
As an alternate to the standard sump, take a look at Paradox's cuttle army tank pictures. He created an interesting filtration set up with a set of plastic drawers and I am thinking about trying something similar when we set up our next large tank.
- Joined
- Feb 18, 2005
- Messages
- 709
This wont work properly. The baffle after the foam block before the return pump should go higher. This last baffle will determine the height of the water in the sump.
Factors involved in determining the height:
-How much water capacity you want to the sump to have left over in case of a power outage
-How deep your skimmer should be submerged for optimum efficiency. (Although you can always make a shelf for the skimmer to sit on to adjust its height. Ive stacked eggcrates to do this)
-If you want to add a refugium section or place for live rock.
I would use a wall that is 2-3 inches shorter then the first wall.
After this wall, the level of the water in the return pump chamber will change depending on how much water is in the whole system. It will slowly drop due to evaporation. This is a good spot to put a float valve if you have a rodi unit or other top off device. With that setup, its another chore you wont have to deal with for evaporation is replenished automatically.
Theres many ways to do this, but if you want to see mine, it can be seen here..I chose to place all my pumps external to keep the heat out of the tank.
150 Gallon Cuttle Farm Army tank build!
- Joined
- Jan 22, 2004
- Messages
- 3,019
Also, for bio balls to work 'properly' they need to have water flowing over them, but not be submerged. In the drawing above, they will be under water.
- Joined
- Dec 22, 2004
- Messages
- 1,713
To expand on Thale's point, most sumps that have an integrated wet/dry are a compromise because you want to have a reasonably high water level in the sump, but the higher it is the more the bioballs are submerged, hindering their function.
Many commercial units try to get the most out of the area above the water level by stretching the first baffle (between your filter sock area and your bioball chamber) very close to the top of the sump. You might also widen the bioball chamber, but you might need some sort of drip plate to distribute water. Remember you're trying to optimize the volume of wet--but not submerged--bio media.
I avoided this altogether by building an inline wet-dry that's outside the sump completely. This isn't the prettiest solution, but it won't be in my living room forever
I appreciate all the info guys.. I have started construction on it.. i am had to make a sacrifice on the water volume.. but since i am adding a seperate refugium that will help in the volume area.. i am widing the bio ball area and adding a drip plate.. i will take a picture when i am done with actual thing.. thanks again
Take major note of Paradox's statement about empty space! I except a small amount of water on my tile floor (not so good for the suspended ceiling in the finished basement) for my 140 during an untimely power outage (when the sump is first topped off) bacause of the need to keep all my pumps under water. It was the best we could do with the cabinet and non-custom DSB sump we have but will definitely do it differently with this next tank.
The more room you can create to work with, the better. The next tank will have a built-in cabinet affair that has nothing to do with the size and shape of the tank and I haven't told Neal that I want a second RO/DI unit plumbed to the kitchen sink to do automatic top-off
The more room you can create to work with, the better. The next tank will have a built-in cabinet affair that has nothing to do with the size and shape of the tank and I haven't told Neal that I want a second RO/DI unit plumbed to the kitchen sink to do automatic top-off
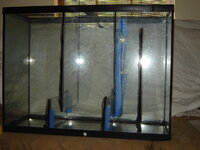
ITS FINISHED!
well here it is... my siliconing skill's need some work but i am pretty sure theywill hold.. it still has some tape on it because i am still waiting on the silicone to dry.. so what do you think? i know its not the best but i had to work with what i had.. i wish the tank was wider but it being tall with give me more surface area for the bio balls..
well here it is... my siliconing skill's need some work but i am pretty sure theywill hold.. it still has some tape on it because i am still waiting on the silicone to dry.. so what do you think? i know its not the best but i had to work with what i had.. i wish the tank was wider but it being tall with give me more surface area for the bio balls..
Attachments
Similar threads
- Replies
- 5
- Views
- 1K


